What is the process for a nerve transfer?
Author: Kelsey Zhao | Reviewer: Michael Berger, Christopher Doherty | Published: 23 January 2024 | Updated: ~
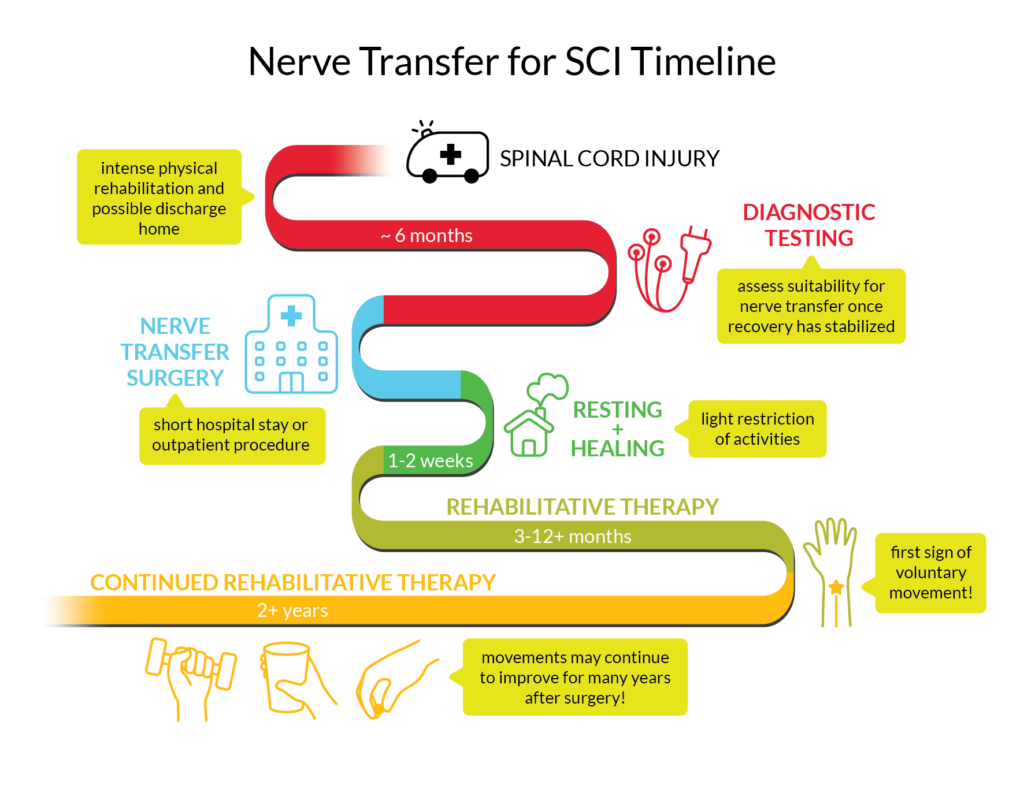
A timeline of the process for time-sensitive nerve transfer for a cervical spinal cord injury where the lower motor neuron of the recipient muscle is injured.9
Before surgery
The irreversible degeneration of muscle needs to be balanced with giving the nerves time to heal from the SCI. However, after 6 months, the probability of nerves recovering on their own becomes much less likely. The timing and type of nerve transfer ultimately depend on the nature of the SCI and what nerves are affected by the injury.
Suitability for nerve transfer is determined through physical examinations of muscle function and electrodiagnostic testing. Physical examination looks at the stability, strength and range of motion (how far you can move a limb in different directions) of the muscles and joints.
Electrodiagnostic tests may include the following:
Electromyography (EMG)
Electromyography measures the activity of nerves in a muscle by inserting a small needle electrode (similar to acupuncture) into the muscle tissue.
Nerve Conduction Studies
Nerve conduction studies measure the strength and speed of the signals travelling through a nerve by sending electrical pulses from a device and measuring with electrodes.
The combination of results from electrodiagnostic tests and physical exams is used to identify nerves and muscles that are functional /non-functional and figure out which muscles and nerves should be used in the nerve transfer. The tests could also determine if there is a possibility that the muscles will recover on their own and not require surgery. The results can also help to estimate what your timeline for surgery might look like.
During surgery
General anesthesia is given before the surgery. Electrical stimulation can be used to make sure the right nerves are being cut. Once the identities of the nerves are confirmed, the healthy nerve is cut and stitched to the cut end of the damaged nerve.
After surgery
In the 1-2 weeks following surgery, activity will be restricted to allow your skin and nerves to heal. After the period of rest, you can return to regular activity and begin intensive physical/occupational therapy. Even though the nerve transfer reconnects the pathway from the paralyzed muscle to the brain/spinal cord, it is not like plugging two extension cords together and having the current run through instantly. Attaching the two nerves allows the recipient nerve to act as a scaffold for the cells of the donor nerve to grow through, towards the muscle. This process can take months or years depending on the distance to the muscle because nerve cells grow at approximately 1mm per day.
Rehabilitation
After healing, you undergo intense physical therapy and occupational therapy to recover and maintain the muscle’s range of motion and strength, and to relearn how to move the muscle with the new nerve pathway. This rehabilitation process will teach you how to use the muscle properly and strengthen the muscles with a variety of exercises. Experts recommend that consistent therapy be continued for a minimum of 2 years.
Research on nerve transfers has found that people can continue to experience improvements in function as far as 4 years after the surgery with physical and occupational therapy.
Some activities to rehabilitate muscle function after nerve transfers include:
Early stage (no movement in the muscle yet)
-
- Education: Understanding which muscles and nerves are involved in the nerve transfer and how the surgery has changed the way they work.
- Range of motion: Exercises to maintain how far the muscle can move in different directions. Splints may be used to manage range of motion and spasticity.
- Donor activation: Physically moving the donor muscle to activate the donor nerve.
- Visualization: Moving the donor muscle and visualizing moving the recipient muscle. This is an important exercise in early rehabilitation.
- Donor co-contraction: Moving the donor muscle and having someone else move the recipient muscle at the same time to strengthen the connection between the nerve and the new movement.
After first sign of muscle movement
-
- Donor co-contraction: Moving the donor muscle and recipient muscle at the same time to strengthen the nerve connection.
- Moving only the recipient muscle.
- Exercises based on real life activities.
- Doing exercises in water or with assistive devices like slings and prostheses can make movements easier by reducing the effect of gravity.
- Biofeedback or neuromuscular electrical stimulation (NMES) may be used to promote movement.
Strength and endurance
-
- Gradually increased resistance of exercises (adding weights).
- Gradually increased repetitions of exercises.
- Incorporating function of muscle into everyday life.
Visualization for muscle rehabilitationVisualization (also known as mental practice, mental imagery, and motor imagery) is a technique where you consciously and repeatedly imagine performing a movement without actually moving your body. One theory for why this technique works is that visualizing a movement activates areas of the brain that overlap significantly with the areas that activate when physically doing the movement. Studies of people without SCI and athletes who use visualization when learning new skills have shown that physical movement performance improves. In rehabilitation for neurological disorders, including SCI, evidence from high-quality studies has shown that visualization used in combination with physical therapy has positive effects on muscle movement. |